Contributing
caution
This document is out of date, but may not be entirely obsolete.
caution
This document may not apply to every shop. Please talk to your shop manager to determine if this document applies to your shop.
We are grateful that you want to contribute to this project!
This guide will help you determine the best way to contribute to this project. By reading and respecting the practices in this guide, others in the community are more likely to value and accept your contributions.
Initial setup#
At a minimum create a GitLab account. This will allow you to create and comment on issues. Choose a name and email that you are comfortable with being public. GitLab will identify you by this name and email when you make and comment on issues. They will also use this information to link your commits to your account.
If you intend to make changes you will need to install and configure Git.
- Download and install git from git-scm.com.
- Configure Git.
When you configure Git, give the same name and email that you gave to GitLab. Again, remember this name and email will become public, as git will include them in each commit you make, and when you contribute them, they will be publicly visible.
Next, on GitLab, fork the project(s) you will be working on. If you are working in a shop, your shop manager will create a shop fork. Use this instead of creating your own. Your shop manager needs to give you permissions to push to the shop fork.
note
If you and your team have been assigned the developer role or higher on the project, you don't need to create a fork. You could instead following the No-Fork Workflow. You may want to read this document first as it provides more details about working with issues, etc.
Submitting issues#
Before submitting an issue, please search all issues to see if your issue has already been reported and/or addressed.
Please label your issue with one of the following labels:
Type::Bug- a request to fix a missbehaving existing feature.Type::Feature- a request for a new or improved feature.Type::Refactor- a request to do something that will improve development.Type::Other- any other work request.
Issues can and should be added at anytime during development. If you see something, say something.
Grooming issues#
Grooming is the process of prioritizing and refining issues into workable units.
- Unreproducible bug reports must be identified and closed.
- Invalid issues must be identified and closed.
- Duplicate issues need to be identified and closed.
- Stalled issues must be identified and the reason for the stall documented.
- Valuable/important issues must be raised in priority.
- Large, vague, issues must be broken into smaller more manageable issues. Ideally it should take 2-3 days at most to implement a solution. If an issue is likely to take longer a plan must be made to implement it in smaller stages (see #TODO link to trunk-based development's page on feature toggle development pattern).
- High-priority issues must be clarified and acceptance criteria defined.
- Well-defined, high-priority issues must be labelled ready.
- Issues must be labelled correctly.
All of this happens by many people reviewing issues and commenting on them. If you see an issue that you believe deserves a higher priority, comment on it and explain why. If you think a card is miss-labelled, comment on it and explain why. If you see an open merge-request that hasn't been worked on in a while and there is no information as to why work as stopped, comment on the card and ask why. If you see a bug and no one except the reporter has been able to reproduce, try to reproduce it yourself and report your result. And so on.
This is an ongoing process. When you look through the issue tracker and its boards looking for something to work on, plan to comment on issues and help prioritize, organized, and prepare them for work.
Refining and prioritizing issues#
This section overlaps with the previous. But now the assumption is that you have identified an issue that you would like to work on. Before working on it, you want to make sure that the issue is well defined, is small and manageable, the community values it, and that it will likely be accepted if you implement it. We do this through discussions on the issue. Specifically, on the issue, you should try to ask and provide answers to the following questions.
- What's the status of the issue? Is someone working on it? Has the effort stalled? If it has stalled, why? Is it blocked by another issue? If so, how can the issue be unblocked?
- For bugs, what is the nature of the problem? What is the current undesirable behavior? What are the steps to reproduce the undesirable behavior? Can you reproduce the undesirable behavior? What is the desired behavior?
- For feature requests, who (what user role) will benefit if the feature is implemented? What is the desired feature? How will that role benefit? What are the acceptance criteria: i.e., how specifically should the system behave if this feature is implemented? Can these acceptance criteria be implemented as automated tests?
- How desirable, important, and/or urgent is the feature or bug fix?
- How should this bug be fixed or feature implemented? What are the different possible implementation strategies? What are the benefits and drawbacks of each strategy? What is the impact of the strategy on the rest of the system? How much effort is required by each strategy? Can the issue be broken into smaller more manageable issues? If so, what would those smaller issues be?
Getting ready to work#
- Claim the issue.
- If you can, assign it to yourself (and your team members).
- If applicable, add your team's label to the issue.
- If you can't assign it to yourself (i.e., you don't have the appropriate permissions to do so), comment on the card that you and your team will work on it.
Claim the issue screenshots:#
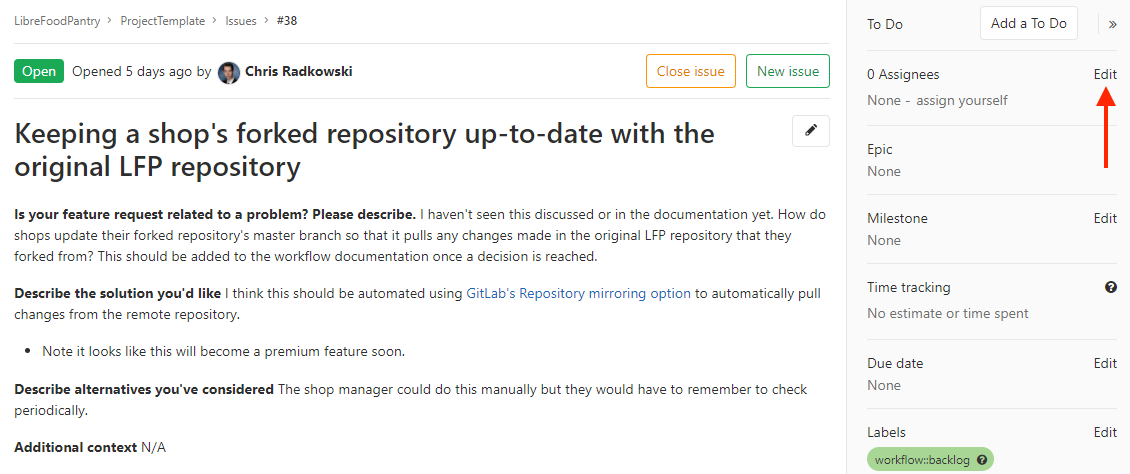
- Select an issue to work on from the issue board
- Click the Edit button under the Assignees section
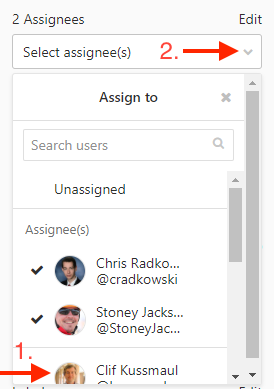
- Select users to assign to the issue
- Click the drop down arrow to add the selected users as assignees to the issue
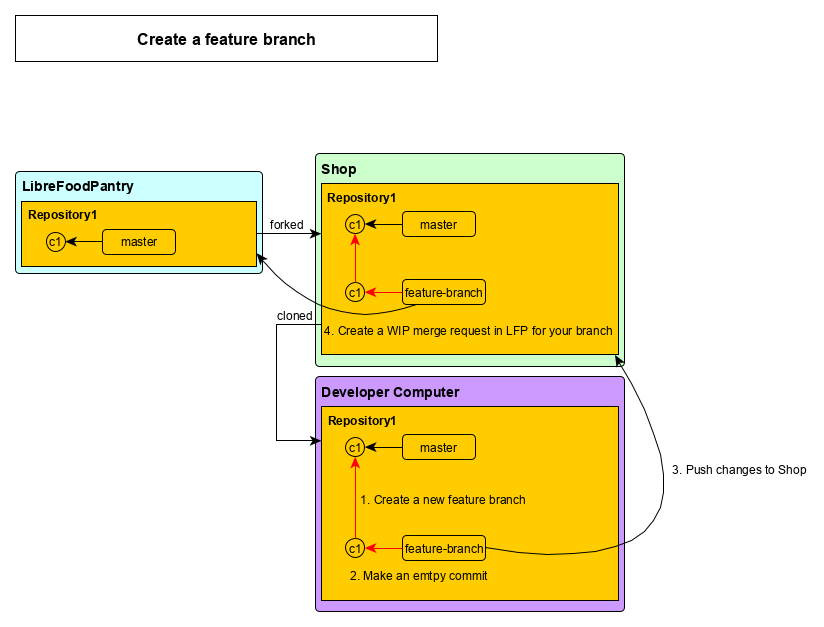
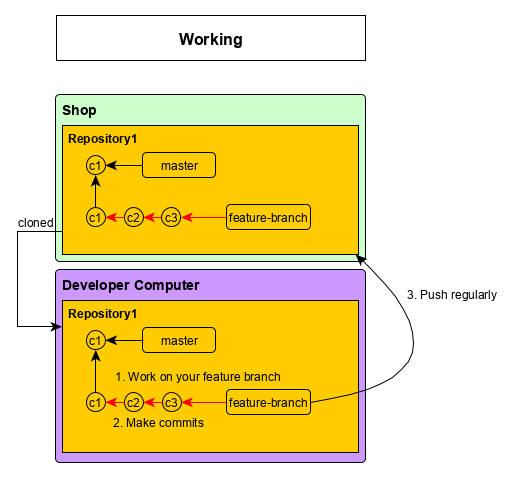
- Open a terminal window locally, and create a feature branch with
git checkout -b BRANCH-NAME, make an empty commit withgit commit --allow-empty -m "empty commit", push it to your fork withgit push --set-upstream origin BRANCH-NAME, and create a merge-request (with a WIP prefix) back to LFP's master branch. (If you are in a team only one member needs to create and publish the feature branch and create the merge-request; after, other members can simply checkout the feature branch in their clone of the fork.)
Create a feature branch diagram:#
- If the issue probably cannot be completed in a single workday by a single developer, break down the issue into a list of smaller task issues linked to the original issue.
Work#
Ideally, this stage is no longer than 2-3 days. The longer it takes to implement the solution for an issue, the more difficult it will be to integrate and merge the solution and the larger the risk that the solution will never get merged. That's why it's important to carefully groom and refine issues.
- Claim a task that needs to be worked on, move it to the appropriate board column while working, work on it, and close it when it's finished. If you think of other things that need to get done, create new tasks for them and add these to the appropriate board column. Help keep tasks that need to be worked on in order.
- Work on your feature branch. Make it a habit to checkout your feature branch each time you sit down to work.
- Credit all co-authors on each commit by including
a
Co-authored-by: NAME <EMAIL>line for each co-author at the bottom of the commit message. - Write automated tests.
- Implement changes.
- Refactor and clean code.
- Update merge-request title and description which will become the final merge-commit message.
- Push changes regularly--even after each commit!
- Others can track your progress.
- Others may become motivated.
- Triggers continuous integration tests and deployment to a demo environment. Manually test in the demo environment.
Board flow#
note
flow::* labels have been depricated. Instead use the labels, boards, and workflows as specified by your shop.
As you work through on an issue from start to finish you should be updating
where it is on the issue board. We have created several specific labels for
this that start with flow followed by a specific value (such as
flow::backlog). Each label represents a specific working state that an issue
is currently in. Note that these are
scoped labels
which means that each issue can only be in one flow state at any time.
Our flow labels (and the process an issue follows as it is worked on) in order are (left to right on issue boards):
- [Open] - these are issues that need to be reviewed by a shop manager to
decided whether to work on them now, later, or never. If "now", move it to
flow::refining. If "later", leave it in [Open]. If "never", label it with an appropriateresolved::*label and close it. flow::refining- these are issues that have been accepted for work, are prioritized, and are being refined to meet INVEST.- Discussions need dicussions and a plan. Often discussions do not move on, but instead generate new issues.
- Bugs need to be reproduced, diagnosed, a solution strategy, a weight, and a plan.
- Stories need acceptance criteria, a solution strategy, a weight, and a plan.
- Spikes need a list of what what's to be learned, the planned experiment, the by-product(s) that will be produced, a plan, and a weight.
flow::ready- these are issues that meet INVEST and are ready to be worked on. When a team begins working on an issue, they assign it to themselves, and move it toflow::in progress.flow::in progress- a claimed issue that is currently being worked on. Link any new tasks created from back to this issue at this point, include any WIP merge requests, or any other working documentation.flow::task to do- a task created from an issue that needs to be done, these are smaller and should take around a day to finish. Claim a task to work on from this column on a board. Move the task to thedoing taskcolumn while it is being worked on. Tasks should be SMART.flow::doing task- a claimed task that is currently being worked on.flow::needs review- a finished issue that needs a review. This could be an issue with an associated merge request that is awaiting reviewers from specific approvers.flow::needs merge- an issue's merge requests has been approved by reviewer(s) and needs to be merged.- [Closed] - issues that have been resolved for any reason.
Work diagram:#
Getting your work reviewed and merged#
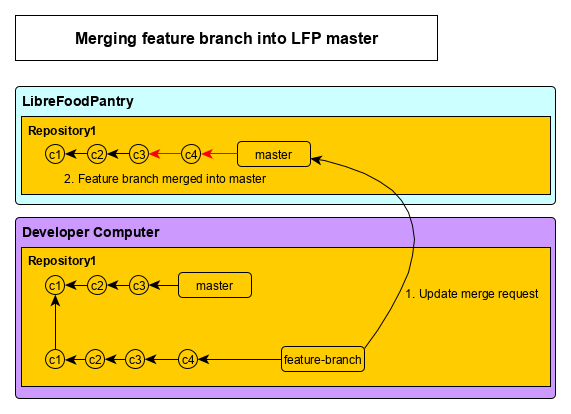
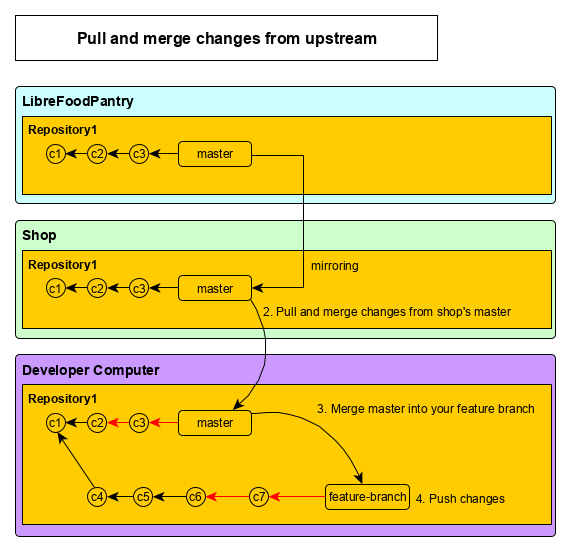
The last stage of contribution is getting your merge-request accepted and merged into upstream's master. This is often the longest stage (2-4 days) as it may require several back-and-forth asynchronous communications between you, the reviewers, and ultimately the committing maintainer.
First, integrate any new changes from upstream's master into your feature branch. It's important to demonstrate that your changes are compatible with any new changes in master before it can be merged. Do this by pulling the changes in your shop's master (since it is mirroring upstream's master) into your local repository's master, merging master into your feature branch, fix any merge conflicts, and running all tests to ensure they all pass (or make more commits until they do). Don't forget to push your work as you go.
- Pull changes from your shop's master and merge them into your local master. If this fails, probably your local master has diverged from upstream's master. This happens if you or someone else accidentally commits to master directly.
- Checkout your feature branch
- Merge master into your feature branch. This may result in merge conflicts which you will need to carefully resolve and commit before moving on.
- Run all tests. You may want to do some manual testing too. If any tests fail, make and commit fixes until all tests pass.
- Stage, commit, and push your work.
Pull and merge changes from upstream diagram#
At this point, you should be ready for a final review. Remove the WIP status from your merge request and request a review from one or more reviewers. They will review your work for the following characteristics in roughly this order:
- All tests pass.
- The merge-request title and description comprise a good final merge commit message (see Commits and Their Messages).
- The changes address the issues it claims to address; nothing more and nothing less.
- New tests are provided the test the new code that has been developed.
- The code and tests follow clean code principles and practices.
- The code and tests are well-designed and read well.
- The code and tests follow the coding conventions of this project.
After you receive a review, you should do your best to satisfy the reviewers through discussion and making and pushing more changes to your merge-request. This process ends when the reviewers are satisfied and mark the merge-request to be merged (or a maintainer merges the merge-request).
Note, even after all the reviewers are satisfied, you may still need to integrate new changes into your merge-request if other merge requests are merged before yours.
Merging feature branch into LFP master diagram#